Page Content – Images
Click on a section title to jump down the web-page:
A. Introduction
1. In Chapter 5, you learned how to add a basic image to a web page.
2. In this chapter, you will learn advanced methods of using images on a page.
3. Images are usually “block content”; you may insert an image block in any area of a section layout.
4. Image galleries look and function best in a single-column section.
5. Image slideshows are a special type of page section, not block content.
B. Image with text
For New Image with Text instruction in Wildfire 5.10, go to this page.
Note: When an Image with text block is viewed on a mobile device, the image will be scaled. The text will be adjusted to the screen size. If you want very specific result with image on text, it is recommended to embed the text directly onto the image using a photo editor, and then upload that image (with embedded text) and place it as a simple Image block into Wildfire. The drawback to doing this is that you will need to create a separate image with each language translated.
1. Select the Content block to which you want to add an image with text by clicking on a link + Add content.
2. A sidebar opens, displaying the types of block content.
3. Click on the option Image with Text.
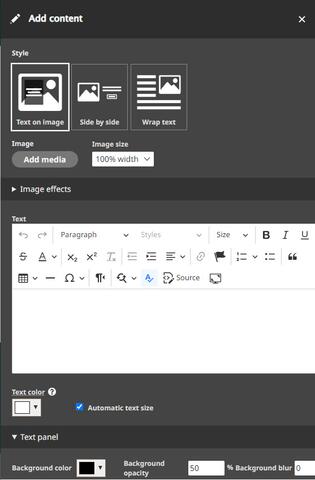
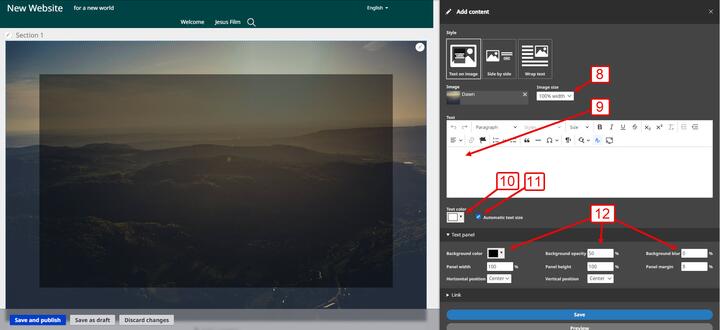
4. A new sidebar opens with features to select an image and write and format text.
5. At the top, choose a one of the three style options.
a) Text on image - Text is overlaid directly on image – Great for a few words
b) Side by side – image and text are displayed side by side in the same content block;
text does not wrap around image. Great for a few words.
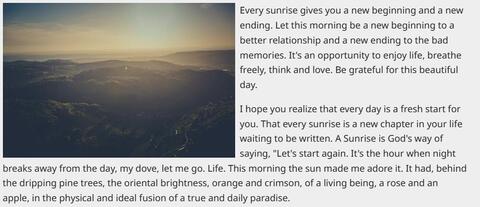
c) Wrap text – text is displayed separately from image in the same content block and wraps around image – great for lots of text.
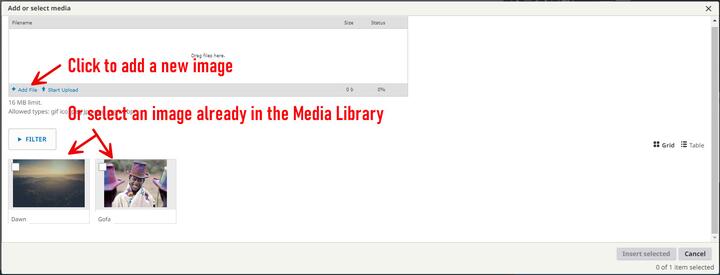
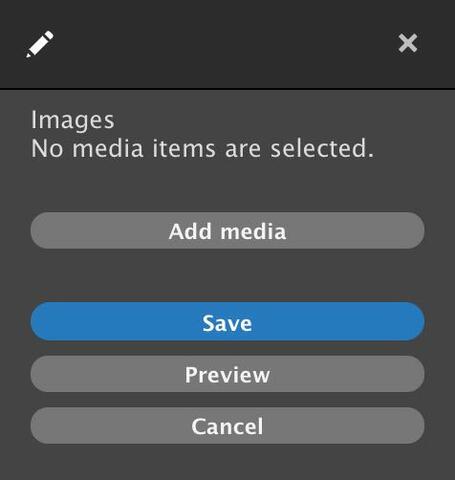
6. In the next section of the sidebar, click on the Add media button to select the desired image.
a) The Add or select media working box opens.
b) You may use the upper section of the working box to select an image file from your computer.
c) If you have already uploaded images to your website, they will appear in the lower section of the working box.
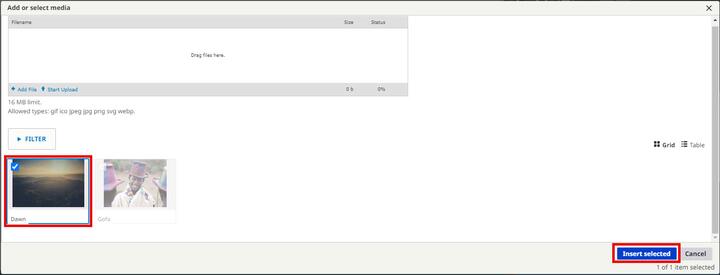
d) Select an image by clicking on the square in the upper left corner of the image thumbnail.
e) Click on the Insert selected button at bottom right of the working box.
f) The image now appears in both the layout panel on the left and in the sidebar on the right.
8. In the sidebar, select the Image size from the drop-down menu.
a) Thumbnail
b) Medium (Try this one first)
c) Large
d) 100% width (fills the width of the layout section / column)
e) Original size (will display based on the original pixel dimensions of the image)
Note that the image will be shrunk or stretched in order to fit your selection (a-d) and therefore may become pixelated. Using the Original size option for small images is a way to prevent pixelation.
9. In the text editor box, write and format text to go with the image.
a) Depending on the style chosen in Step 5 above, you may want more or less text.
10. Change the color of the text, make sure it can be read on top of the background.
11. Automatic text size – leave this checked in most cases. There may be times to uncheck it, but be aware that the text will no longer automatically adjust for smaller screens (phones)
12. Panel options – you can fine tune how the panel appears with each of these options.
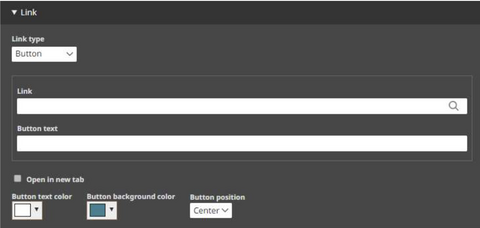
13. In the lower section of the sidebar, you may configure the Image with Text as a hyperlink.
Choose whether the link type is the Entire image, Text only, or a Button.
a) If you choose Button as the link type, the sidebar expands to offer additional features to customize the button.
Link: Type or paste the link, see Note below.
Button text: Write text to appear on the button.
Open in new tab: Check this box to make the browser open a new tab when button is clicked.
Button text color: Select a text color for the text.
Button background color: Select a background color.
Button position: Choose whether the button is positioned at the left, center, or right of the image.
Note:
* To link to an external website: In the space titled Link, enter the URL of the external website, starting with "http".
* To link to another page on this website: In the space titled Link, begin to write the title of the page. A list will appear of page titles which match. Click on the desired page.
12. Click on the Save button at the bottom of the sidebar.
13. Click on the Save button on the layout editor screen.
14. Your work appears on a preview of the page.
C. Image gallery
1. A gallery is a special type of content block.
2. The gallery displays a collage of thumbnails in varying sizes of the images in the gallery.
a) Click on a thumbnail image to enter the full-image gallery viewer.
b) Use the right and left arrows to scroll forward and back through the gallery.
c) The numbers at the upper left tell you how many images there are and which one you are looking at.
d) Image captions, if provided, appear at the bottom of the screen.
e) Click on the X at the upper right to exit the full-width gallery viewer.
3. Use image galleries on your website to group photos and images by subject or theme.
4. Image galleries look and function best in a single-column section.
5. Select the Content block to which you want to add an image gallery by clicking on a link + Add content.
6. A sidebar opens, displaying the types of block content.
7. Click on the option Gallery.
8. A new sidebar opens with features to select images for the gallery.
9. Click on the Add media button.
a) The Add or select media working box opens.
b) You may use the upper section of the working box to select image files from your computer.
c) If you have already uploaded images to your website, they will appear in the lower section of the working box.
d) Select images by clicking on the square in the upper left corner of the image thumbnail.
e) Select multiple images for a gallery, but no more than 20.
f) Click on the Insert selected button at bottom right of the working box.
g) The images now appear in both the layout panel on the left and in the sidebar on the right.
10. Click on the Save button at the bottom of the sidebar.
11. Click on the Save button on the layout editor screen.
12. Your work appears on a preview of the page.
a) The images change automatically and continue to do so in a loop.
b) Place the mouse cursor over an image to pause the slideshow on that image.
c) Use the arrow buttons at right and left to go forward or back manually.
2. Add slideshows to your website to group photos and images by subject or theme.
3. To add an image slideshow, click on a link + Add section.
4. A sidebar opens, displaying the types of sections.
5. Click on the option Slideshow.
6. A new section area appears for the slideshow.
7. Click on the link + Add images to slideshow.
8. A new sidebar opens with features to select images for the slideshow.
9. Click on the Add media button.
a) The Add or select media working box opens.
b) You may use the upper section of the working box to select image files from your computer.
c) If you have already uploaded images to your website, they will appear in the lower section of the working box.
d) Select images by clicking on the square in the upper left corner of the image thumbnail.
e) Select multiple images for a slideshow, but no more than 20.
f) Click on the Insert selected button at bottom left of the working box.
g) The images now appear in the sidebar on the right.
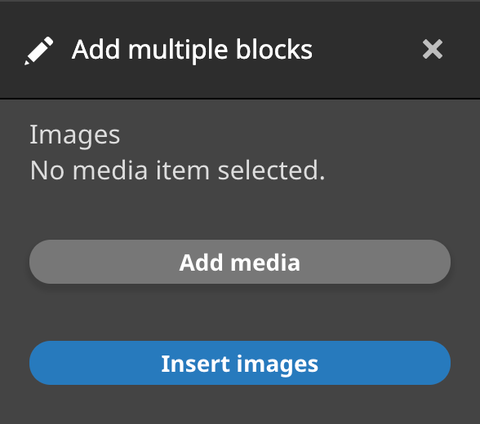
10. Click on the Insert images button at the bottom of the sidebar.
11. You may edit the Slideshow section in the same way that you edit any other section.
a) Click on the Edit slideshow link at the upper left edge of the section.
b) A sidebar opens to the right.
c) You may choose the relative width of the section on the visible page.
d) You may specify Space above section in pixels. This adds separation on the page from the section above (if there is one).
e) You may choose whether the whole section has a colored background (from a limited selection within the color scheme) or an image as a background.
f) Once you are finished, click on the Save button.
12. Click on the Save button on the Layout Editor screen.
13. Your work appears on a preview of the page.
E. Google map
1. You may insert a Google map on your website to help visitors know where you (or any other feature) are located geographically.
2. Select the Content block to which you want to add a Google map by clicking on a link + Add content.
3. A sidebar opens, displaying the types of block content.
4. Click on the option Google Map.
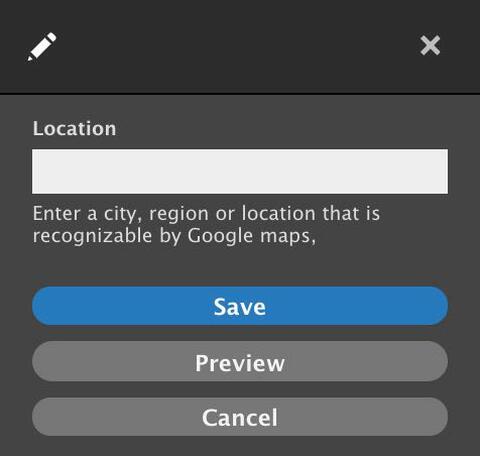
5. A new sidebar opens with features to configure the Google map.
6. In the space titled Location, write an address, the name of a city, or another description that Google Maps will recognize.
You may need to experiment with this description to get the desired results.
7. Click on the Save button in the sidebar.
8. The sidebar disappears, and the resulting map appears on the Layout Editor screen.
9. Click on the Save button on the Layout Editor screen.
10. Your work appears on a preview of the page.
11. Within the Google map frame, you will find many of the same features as at the Google Maps website.
a) Zoom in and out with the + and – icons at the lower right.
b) Toggle between map mode and satellite photo mode at the lower left.
c) Anywhere on the map, click and hold and move the cursor to move around the map.
d) Click on the link View larger map at the upper left to go to the Google Maps website and see the same geographic location.
Image with text
1. Select the Content block to which you want to add an image with text by clicking on a
link + Add content.
2. A sidebar opens, displaying the types of block content.
3. Click on the option Image with Text.
4. A new sidebar opens with features to select an image and write and format text.
5. At the top, choose a style for how the image and text are displayed relative to each other.
a) Text on image - Text is overlaid directly on image – Great for a few words
(Background Panel on by default)
(Background Panel off (set opacity to “0”)
b) Side by side – image and text are displayed side by side in the same content block;
text does not wrap around image. Great for a few words.
Side by side
c) Wrap text – text is displayed separately from image in the same content block and
wraps around image – great for lots of text.
Wrap text
6. In the next section of the sidebar, click on the Add media button to select the desired image.
a) The Add or select media working box opens.
b) You may use the upper section of the working box to select an image file from your
computer.
c) If you have already uploaded images to your website, they will appear in the lower
section of the working box.
d) Select an image by clicking on the square in the upper left corner of the image
thumbnail.
e) Click on the Insert selected button at bottom left of the working box.
f) The image now appears in both the layout panel on the left and in the sidebar on the
right.
8. In the sidebar, select the Image size from the drop-down menu.
a) Thumbnail
b) Medium (Try this one first)
c) Large
d) 100% width (fills the width of the layout section / column)
d) Original size
9. In the text editor box, write and format text to go with the image.
a) Depending on the style chosen in Step 5 above, you may want more or less text.
10. Change the color of the text, make sure it can be read on top of the background.
11. Automatic text size – leave this checked in most cases. There may be times to uncheck
it, but be aware that the text will no longer automatically adjust for smaller screens (phones)
12. Panel options – you can fine tune how the panel appears with each of these options.
13. In the lower section of the sidebar, you may configure the Image with Text as a
hyperlink.
a) Choose whether the link type is the Entire image, Text only, or a Button.
1) If you choose Button as the link type, the sidebar expands to offer additional
features to customize the button.
(a) Write text to appear on the button.
(b) Select a text color.
(c) Select a background color.
(d) Choose whether the button is positioned at the left, center, or right of the
image.
b) Link to an external website: In the space titled Link, enter the URL of the external
website, starting with "http".
c) Link to another page on this website: In the space titled Link, begin to write the title
of the page. A list will appear of page titles which match. Click on the desired page.
12. Click on the Save button at the bottom of the sidebar.
13. Click on the Save button on the layout editor screen.
14. Your work appears on a preview of the page.


